Space! One of the seven great elements of art. Think of a blank piece of paper. You have this empty space that you need to fill. Where do you begin? The position of your vanishing point, the overlapping, size and color of your objects are all related to space. But! Before we go on, we gotta define space…
Space is how objects in an artwork interact with their environment (and each other) to create the illusion of depth. Space can be created by overlapping and arranging objects, varying the size and color of objects and using linear perspective. The area within an object is called positive space. The area surrounding an object is called negative space.
In this article we’ll discuss how space is used to create a compelling and believable artwork, how objects interact with each other in their space. We will then take a look at positive and negative space (suuuper important!). Finally, we will discuss how to use space in your art.
Alrighty, put on your space pants and let’s commence!
Space! The Relationship Between Objects
An object on its own does not have any frame of reference. How big is it? How far away is it? We do not know this until we place something else in the space to give us something to compare the object to.
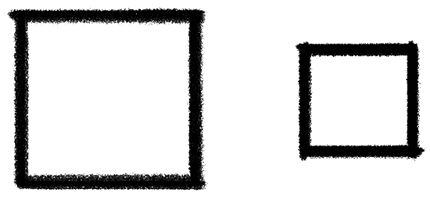
For example, if you take an object and put it next to something larger, then it will look small.
If you then put that object next to something small, then the object will now appear big.
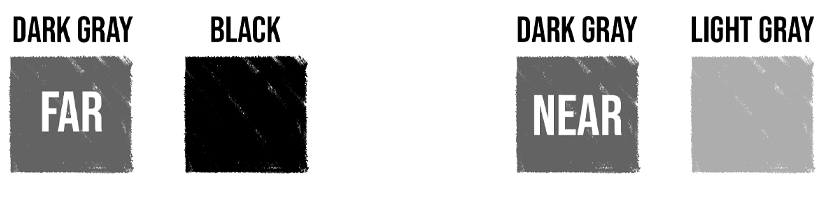
If you put the object next to something darker, then it will appear further away.
If you put the object next to something lighter, it will appear closer.
To add extra spacial context to your drawing, throw in a horizon line (where earth, water or faraway buildings meets the sky). The closer the base of your object is to the horizon line, the further away it will appear.
If you draw an object faraway from the horizon line, and then draw that exact same object one the horizon line, the object on the horizon line will look waaaay bigger!
Types of Space in Art
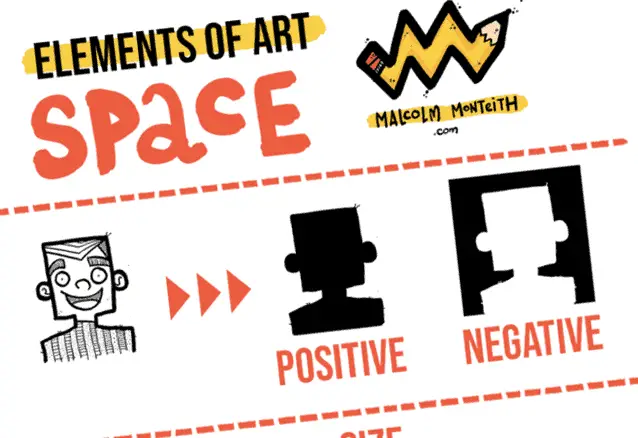
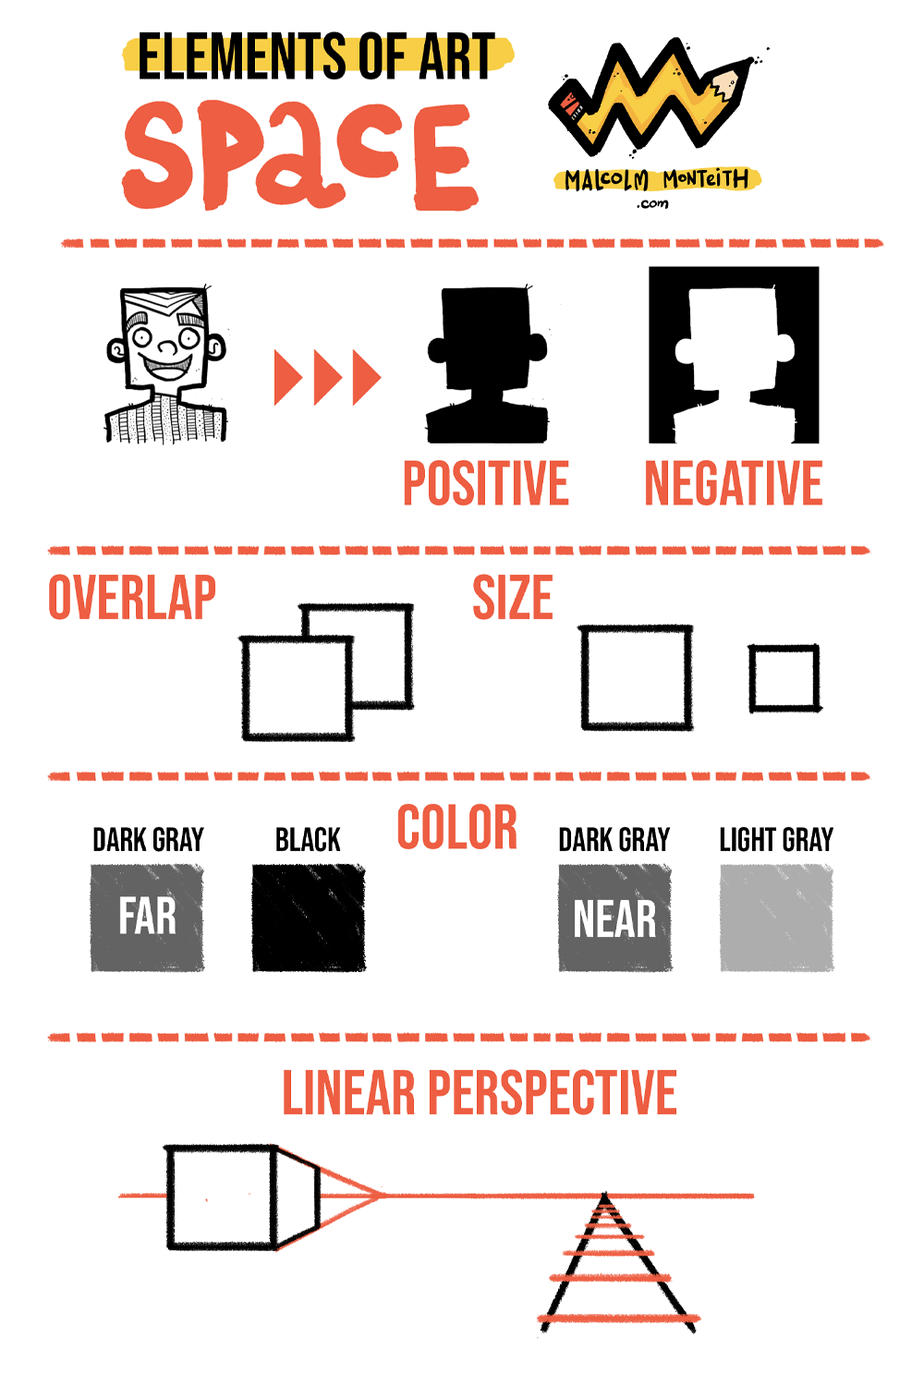
There are many techniques to create space in an artwork. But in its simplest form, space can be split into two different types: Positive space and Negative space.
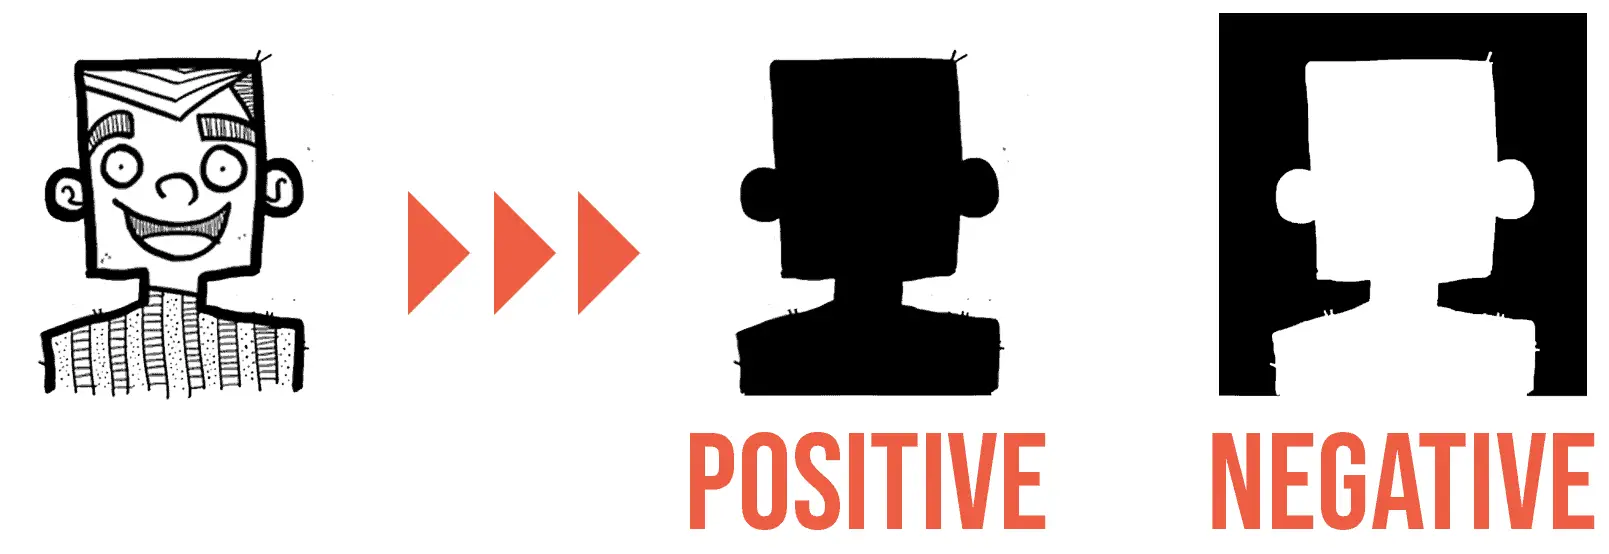
What is Positive Space?
Positive space is the area in an artwork that is taken up by the main subject. The positive space is usually what the audience will notice first about an artwork.
What is Negative Space?
Negative space is the area that surrounds positive objects. Helps to give the viewer a more clear understanding of what the object is that is surrounded by the negative space.
How Do Positive Space and Negative Space Work Together?
Positive and negative space both need each other. Yes, positive space is usually the star of the artwork, but without negative space, the positive space would not exist.
Not only are positive and negative space important to the final image, but also crucial when creating the image.
Why is this?
Artists will often use negative space when working out proportions for an artwork. For example, imagine yourself in a life drawing workshop…
The model has her hand on her hip and you are wanting to capture the angle of her bent arm. You would study the negative space (the triangular space that is created by her arm and torso) and use it as your guidelines to create an accurate representation of her arm.
In other words, if the negative space (the triangle) is wrong, then the positive space (her arm) will be wrong too.
There ya have it! If an artist spends the time and effort to create a negative space that is both interesting and accurate, then this will enhance the appeal and accuracy of the positive space (and the overall artwork, too).
If the positive and negative space has not been properly defined in an artwork, then the artwork may look less appealing, and confusing to the viewer.
So! Think about what kind of artwork you would want to create.
Do you want something that draws the viewer in immediately? Then take the time to create a powerful positive and negative space relationship!
How to Use Space in Art
A flat image can create the illusion of depth by using techniques such as:
- Overlapping objects
- Varying the size of objects
- Varying the color of objects
- Using Linear Perspective
Overlap
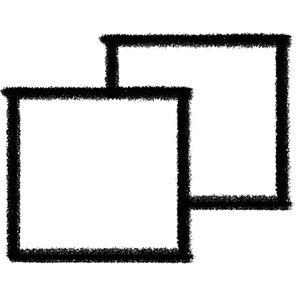
Drawing one object being obscured by another object in front of it will automatically allow the viewer to know that there is a depth and visual hierarchy in the image.
When using overlapping in your drawing, it helps to plan ahead. Draw the frontmost object first before drawing the objects obscured by it.
Size
Drawing the same object at different sizes will tell the viewer that the smaller the object, the further away it is. And vice versa.
In the space you are creating, it helps to create a horizon line to allow the viewer gain a solid understanding of an object’s placement.
The placement of your objects in relation to the horizon line will alter the audience’s perception of those objects.
- A small object closer to the horizon will appear far away
- A large object close to the horizon line will appear huuuuge!
Color
Adding color can have an enormous impact on space in your artwork. The depth of your artwork will be greatly impacted by what color you use.
As a general rule:
- An object that is darker will appear closer to the viewer
- An object that is lighter will appear further away to the viewer
This can even be achieved by simply different shades of gray (known as value).
A handy tip is to pay attention to the color of your largest space. For example, if you are creating a landscape painting, the color of your largest space will be the sky.
The closer you color your object to the sky’s color, then further away that object will appear. This is a wonderful thing called atmospheric perspective!
Linear Perspective
Linear perspective is one of the most powerful techniques that an artist will use to create the illusion of depth and space in an artwork.
But before we go any further, let’s talk a bit of math first!
Boring Mathsy Section Starts Here…
If you think of a two dimensional plane, it has two axes (or directions). It has an x axis going (side to side), and a y axis (going up and down).
In you look at the previous examples above, everything up until this point have been drawn in a two dimensional plane. That is, focussing on the x and y axis to make completely flat objects, devoid of depth and perspective.
But fear not, linear perspective is here to make our drawings three dimensional! (Also, this is the end of the math section)
How Does Perspective Work?
In it simplest form, perspective requires a horizon line and a vanishing point.
Every line going into the distance will converge towards the vanishing point.
Every line that is parallel to the horizon line will get closer and closer to one another as they approach the horizon line.
Once these two rules have been established in the artwork, then the artist will now be able to create a picture with a convincing sense of depth and distance.
Perspective Example: Rails and Sleepers
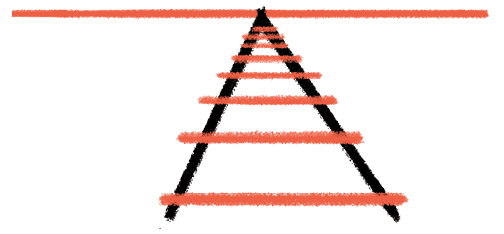
I’m going to be completely unoriginal and talk about train tracks going into the distance. Look, I wanna be creative, but the train track example is perfect way to show how lines react to the horizon line and vanishing point
The train track’s rails can be seen as two parallel lines converging to the vanishing point.
The short lines perpendicular to the tracks are called sleepers. These can be seen as horizontal lines that recede (get closer and closer together) as they approach the horizon line.
We know in reality that the rails are parallel to each other. But when we use perspective in an artwork, this creates a space that make it appear that they are converging together (because we have created the illusion of depth!)
Similarly, we know that the sleepers are equidistant to each other. But when we draw them in perspective, they gradually get closer and closer together.
This is because they are parallel to our vanishing point, which makes them recede the further away the get from the viewer.
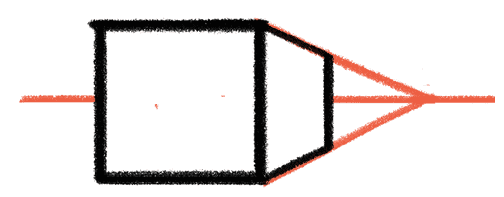
Perspective Example – Cubes
So we’ve covered the ol’ railway example, but as you know, train tracks are pretty flat. So let’s do a more three dimensional example – a cube.
First, set up your space by establishing a horizon line and vanishing point. Then draw a square somewhere in your space.
At each point of the square, lightly draw perspective lines going towards the vanishing point.
Next, draw in the other edges of the cube.
Finally, trace over your cube with dark lines. You have now drawn an object in a three dimensional space! Except… it’s an illusion on a flat surface. Nice!
What About the Space Surrounding Art?
So far, we have been talking about how space is used on a flat piece or paper or canvas to create the illusion of depth. But now let’s zoom out a bit and focus on the space surrounding the art!
Think back to a time when you were in a gallery. Did you ever notice the space? A gallery’s space often consists of white walls, with well spaced out artworks. This gives each artwork ample room for the audience to focus on each one.
What about the frames? Personally, I have sometimes come across paintings that I don’t particularly like. But then they are wrapped up in the most exquisite frame, and displayed in a beautifully lit room.
And guess what – I sometimes ended up loving the artwork! Even though the space inside the image itself didn’t appeal to me, it was the space around the artwork that got it over the finish line.
Put Some Space around the Space!
As long as there is art, then there will always be people who will buy art for the sole purpose of hanging it on a wall.
There is no greater compliment for artists than when someone chooses to part with their money so that they can hang one of your works at home. So make sure you think about the space that your art will be surrounded by.
This could be the color of a frame which matches the color scheme of a painting. Or maybe it’s choosing non reflective glass for a painting that will hang in a well lit room.
Whenever I am getting some paintings framed for an art show, I always love discussing with the framer what space should I place my painting inside of.
So, before you do any fancy framing, first always aim for your artwork to be great on its own. And if you wanna go the extra mile – put that artwork in something beautiful before it goes on the wall.
Conclusion!
Space – one of art’s great elements – plays an important role in helping an artwork come to life. Space helps create the illusion of depth and will draw the viewer into the artwork.
In this article we have discussed how:
- Space is used to make an object appear near, far, big or small
- Positive and negative space work together to help an artist with their proportions, and to help create a solid composition
- Space can be created using techniques such as overlapping objects, varying the size of objects and varying the color and value of objects
- Linear perspective is an extremely powerful tool used to create space in an artwork
- Establishing a horizon line and a vanishing point will further enhance the illusion of space. And will help the viewer have a better understanding of the space that the artist has created.
I hope you have enjoyed learning about space. Feel free to check back here any time if you need to revisit any of these points.
Best of luck in your art adventures and thank you for stopping by!
Malcolm
Melbourne, Australia
Check out more Elements of Art right here:
3 thoughts on “Elements of Art – Space! (and How to Use It!)”