One of the best things about learning to draw is this: If you can draw simple shapes, then you can draw anything! You just need to know how to put those shapes together to create an interesting picture. In this lesson, we are going to be focussing specifically on how to draw cartoon faces (using a variety of shapes).
When drawing a cartoon face, all of the features can be drawn using simple shapes. Start with the main shape of the character (the head). Then add in the main features (the ears, eyes, nose and mouth). Once all of these main features are drawn in, then finally focus on adding in details. The main features of the face should be drawn using thick lines and any small details should be drawn using thin lines.
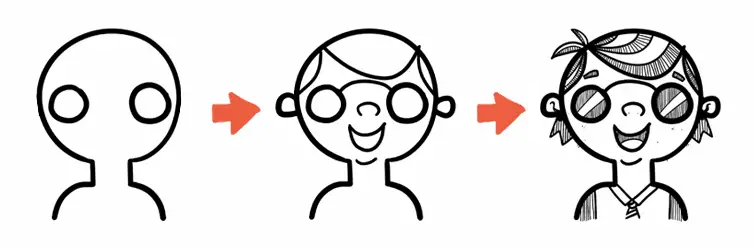
The purpose of this lesson is to show you how to create interesting and unique characters. I will be showing you some examples below of how to build up a character step by step. Feel free to draw along, following the steps below:
- We will start with squares, rectangles, circles and rounded rectangles for our characters’ head shapes. (I will usually draw in their necks and shoulders at this stage as well).
- We will then add in the main features, still using basic shapes and simple lines (ears, nose, mouth, hair etc.)
- Once all of the main shapes are drawn, we can start having fun with adding in some shading and details using thin lines. In the examples below, you’ll see that I block in a black background to make the characters (figuratively) pop! It’s a lot of fun, but of course, this is not mandatory to do :D
So, all you need are a few solid confident shapes, followed by adding in a bit of detail – if you follow these steps, you will quickly see that anyone can draw a fully detailed cartoon face!
We are going to be drawing a mixture of both male and female cartoon faces using basic shapes. You can follow along using a pencil, a pen or a tablet – whatever floats your boat! Let’s begin!
How to Draw Male Faces Using Simple Shapes
Let’s start with the dudes. There are a few different face types below for you to try out. If you’re interested in learning to draw some more of these male characters, then check out my online course on how to draw male faces.
Main Head Shape: A Rectangle
Okay, this guy looks a bit like Buzz from Home Alone, so I’m gonna call him… Kevin.
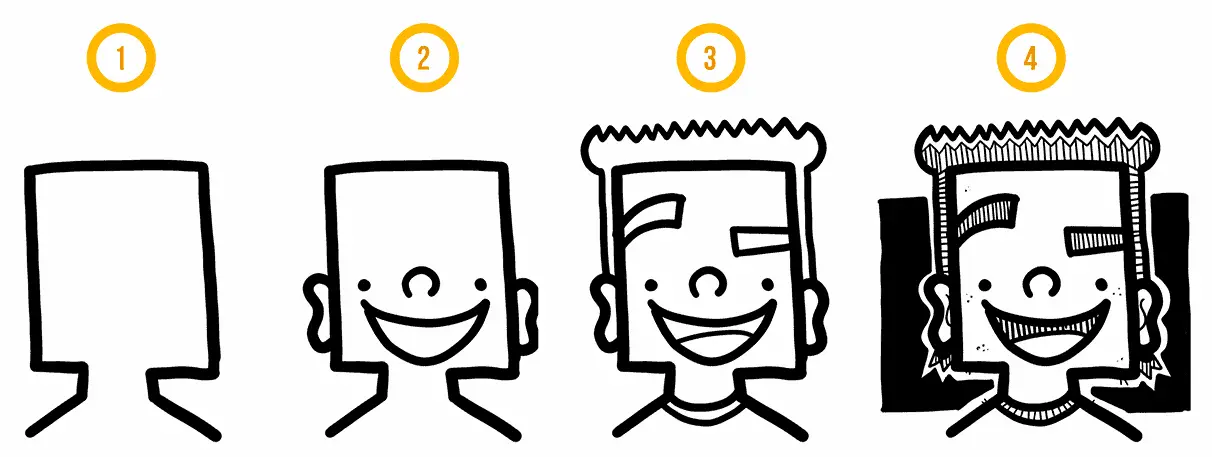
Step 1: The Rectangle and Shoulders!
Start with a rectangle for his head, with some sloping shoulders
Step 2: Add in Facial Features in the Bottom Half of His Face…
Draw in some peanut ears. And for the features on his face, keep everything in the bottom half of the rectangle. Give him two thick dots for eyes, a cute piggy nose (at the same height as his eyes) and draw in his smile underneath.
Step 3: Draw in Some Spiky Hair…
Add in some asymmetrical eyebrows. one raised up high on his forehead (a bendy rectangle) and the other straight and down low (a more normal lookin’ rectangle). For his hair, draw two vertical lines goin straight up from his ears. For the top of his hair, draw an arc on each side and then connect them with a whole bunch of zig-zags.
For his T-shirt, draw in two parallel curves. Draw in a thin, curved line for his tongue.
Step 4: Let’s Shade!
Using thin lines, shade in his hair, eyebrows, mouth and T-shirt. Also, let’s give him some indications of a mullet – sticking out from under this ears. Then, draw in some freckles and a few stray hairs. Finally, let’s put in the background.
Main Head Shape: A Circle
Next up is the “Backpack Kid” – with his big round head with spikes all over!
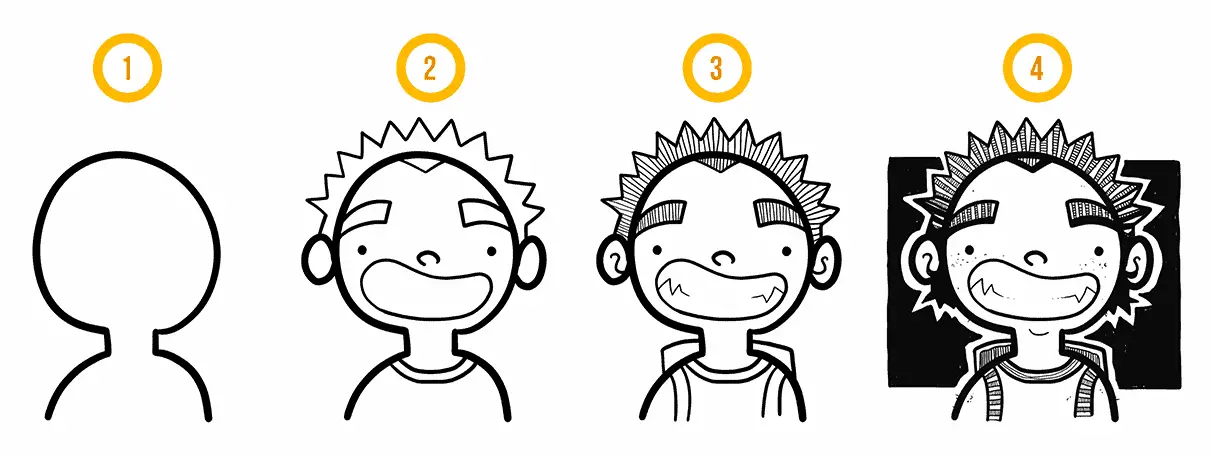
Step 1: Round Head!
Draw a circle for his head and some nice round shoulders.
Step 2: Put in Some Features…
Next let’s draw two little dots for eyes. A little button nose…and a HUUUGE mouth! Add in some big eyebrows and draw a line of zig-zags following the shape of his head.
Draw a V at the top of his head for his hairline and two curved lines under his neck for his T-shirt.
Step 3: Give Him a Backpack and Start Shading…
Now that the main shapes are in, let’s now start putting in some details. Draw an S in each ear and add in some sharp teeth (using the power of zig-zags!)
And if you love drawing a whole lot of lines in repetition, here is your chance to do some for the shading on his hair. Now let’s move down south and give him a backpack.
Step 4: Keep Drawing in Details and Add in Some Sweet, Black Shadows!
If you feel we haven’t done enough shading – let’s go one layer deeper. On his hair and eyebrows, shade in one stripe and leave the next one along unshaded. Then simply repeat.
Finally, block in some solid areas of black, which will push all the details back and make us focus on the areas of high black and white contrast. Don’t forget that sweet mullet which is just some random zig-zags shaded in black.
Main Head Shape: A Rounded Rectangle
This character’s name is “The Publican”. He’s an old-timey kinda guy with a big ol’ rounded rectangle head with asymmetrical features! (I reckon he listens to country music.)
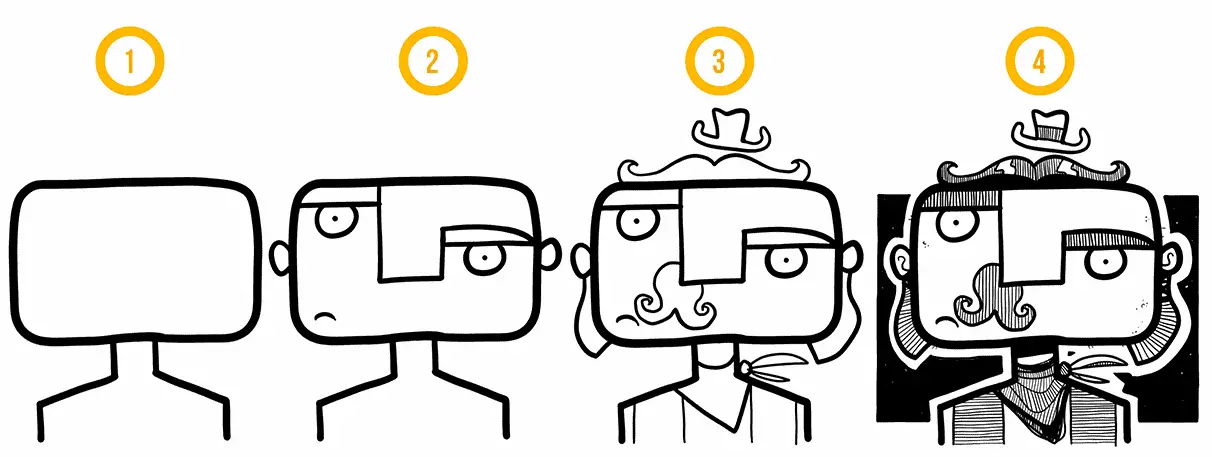
Step 1: Wiiide Head!
Start by drawing a rounded rectangle with sharp, sloping shoulders
Step 2: Give Him Some Picasso Features…
Let’s make this guy asymmetrical – Draw two circles for his eyes. Then draw in his nose (which is just an unfinished rectangle) and give him some eyebrows. (These are all just simple lines :D)
Next draw in some tiny little ears and a small mouth in the bottom left corner of his face.
Step 3: Give Him Hair…
Now we are moving into the details. This guy has hair all over the place! Draw a curly moustache, side burns and a curly hair-do on top.
Now let’s move down below and give him a bandana and a waist coat.
Step 4: We are Ready for Shading!
On his hair, hat and clothes, draw in some repetitive, thin lines within these shapes. Then let’s add in a bit of black underneath his neck, ears and hair-do.
Finally, draw in a black background to make him (figuratively) pop!
Alrighty, that’s it for the dudes, let’s now learn to draw some female faces!
How to Draw Female Faces Using Simple Shapes
Alrighty, we’ve drawn a few blokes, now let’s move onto the feeeeemales! In this section, we will be following the same procedure as above. So feel free to grab some pens and draw along with me!
If you’re interested in learning to draw some more of these female characters, then check out my online course on how to draw female faces.
Main Head Shape: A Square
This young lady is called “The Baller”, due to her insane basketball skills and super long stature!
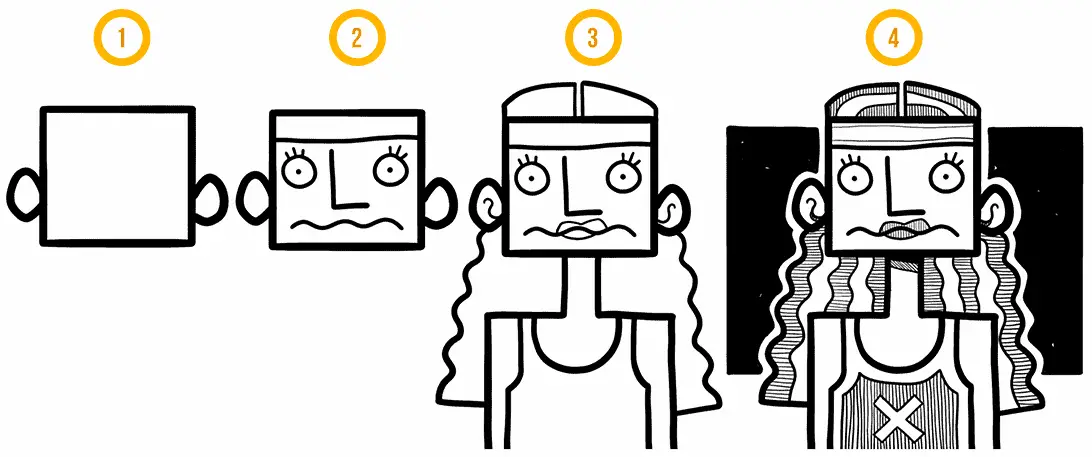
Step 1: One Small Head
Let’s start easy by drawing a small square with some ears…
Step 2: Draw in Some Facial Features…
Now give her one big L in the middle of her face, a horizontal squiggle for her mouth, two circles for eyes and a horizontal line on top for her headband.
Step 3: Give the Head a Body!
Put in some hair on the top of her head. Now give her a looong neck with square shoulders. For her hair, add in some squiggles going from the bottom of her ears down to her arms.
Step 4: Finish with Some Shading
Start breaking up the shapes with thin lines. Then shade in these smaller shapes with thin, repetitive parallel lines.
Main Head Shape: A Circle
This one is called “Ornate Kate”. She’s made up of circles and is tremendously ornate!
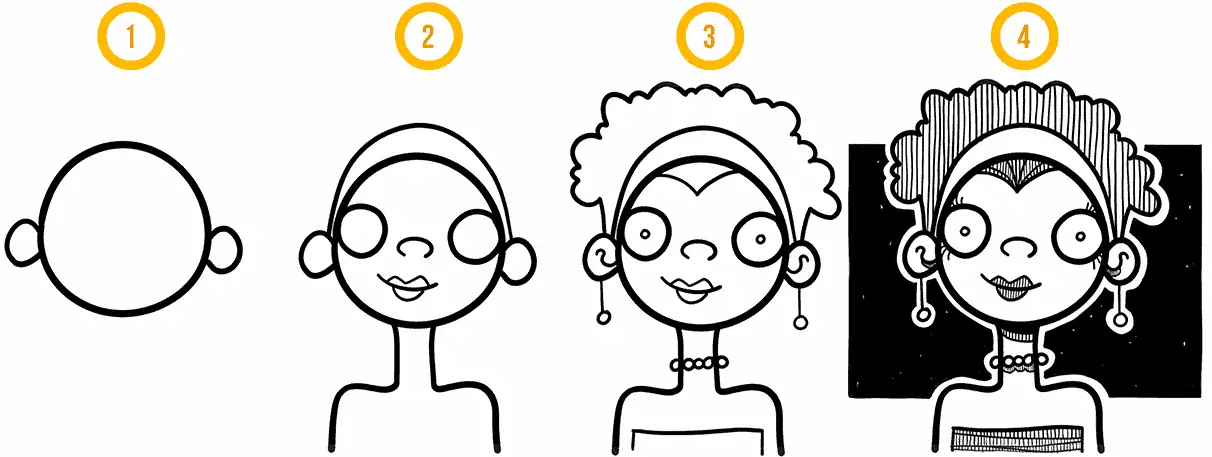
Step 1: Start with Three Circles!
Draw one big circle for her head and two little circles for her ears
Step 2: More Circles and Curves!
Draw two circles for her eyes (make them far apart and touching the sides of her head). Draw a curve above her head for her headband and add in some lips and a cute lil button nose.
Step 3: Hair, Clothes and Jewellery
For her hair, draw in some curves going around her head (kinda like a cloud or a tree!). Draw in her pupils and hairline (and a squiggly S in each ear).
Speaking of ears, draw a vertical line down from each ear with a circle for her earrings. for her necklace, draw some tiny circles going across her neck. For her dress, just draw in a cut-off rectangle.
Step 4: Let’s Shade!
Get out your thin pen and draw in some thin, confident lines to shade in her hair, lips and dress. You can also put a bit of shading under her necklace and chin. Don’t forget to draw in some lashes as well!
Head Shape: A Rounded Rectangle
Next up is “The Hiker”. Just look at that headband! I bet she loves hiking!
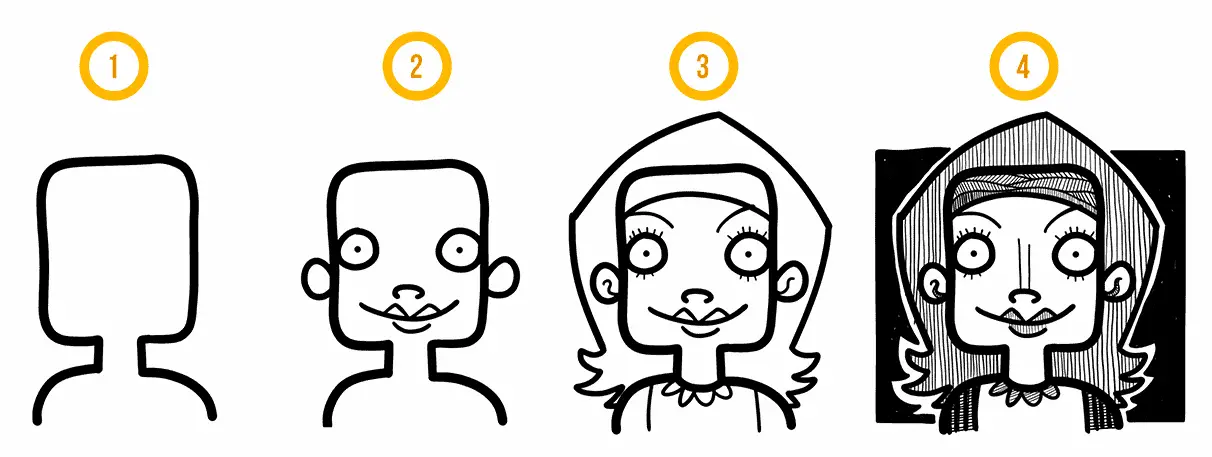
Step 1: Rounded Head and Shoulders
Draw a rounded rectangle for her head and some rounded shoulders
Step 2: Put in that Face!
Add in two circles touching the sides of her head and some small circles for her ears. Give her a button nose and lips (think of the top lip as an M, and the bottom lip as a U).
Step 3: Add Some Hair and Clothes
Draw her headband at the top of her face, with some sharp eyebrows poking out. Move back down to the eyes and give her some eyelashes. For the top of her blouse, draw a curve across her neck, and then some tiny U’s underneath. Draw a line on each shoulder for her cardigan.
Step 4: SHAAAAADE!
Shade in her lips, hair, headband and cardigan. Finally draw in a nice, black background!
Let’s Draw One More!
Finally, let’s draw “The Fresh Princess”. (Actually… that’s a great idea for a TV show)
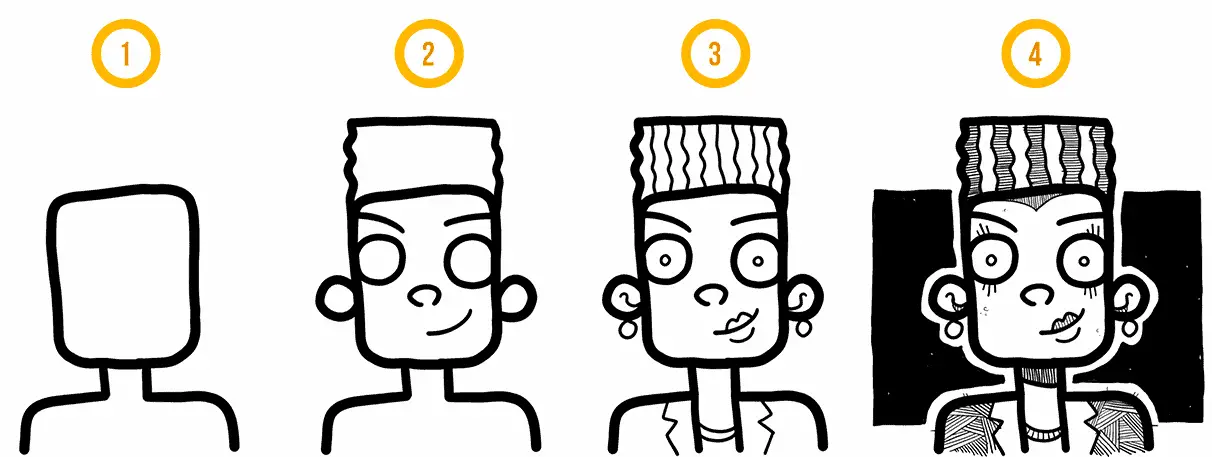
Step 1: Heads ‘n Shoulders
Draw in a rounded rectangle a neck and shoulders (which is kinda half a rounded rectangle)
Step 2: Circles ‘n Squiggles
We’re gonna give this lady some amazing, gravity defying hair! Draw some vertical squiggles going up from each side of her head. Connect these with a horizontal line going across the top of her hair.
Draw in some circles for her eyes and ears. Draw in her little button nose and draw a curved line for each eyebrow and her smile.
Step 3: Put in Those Details!
For her jacket, continue the line down from her neck with a thick pen. With a thin pen, draw in the top of her blouse and jacket collar. Draw some tiny circles for her pupils and earrings.
For her hair, draw some thin-lined squiggles following the pattern of her hair’s main outline.
Draw a curved S in each ear and put in some lips.
Step 4: Beauuutiful Shading!
Time to shade! At the top – shade in each alternating section of her hair (and draw in a hairline just above her eyebrows). Draw in some lashes and shade in her top lip.
Next, put some shading where her neck meets her head. Then add in some cross-hatches (or whatever pattern you desire) to her jacket. Finally, put in a sweet black background!
Conclusion!
So there ya have it! We have learnt that drawing a cartoon face can be drawn using simple shapes. with a bit of regular practice, you’ll be smashing out some cool little drawings with ease!
Remember to start with the big shapes – then move onto the smaller ones. So, first draw the shape of the head. Once you’re happy with the head shape, you can then move onto the facial features. After you have all of your shapes locked in, you can then have some fun shading things in!
I have shown you quite a linear process here, but remember that in practice, drawing is anything but linear! Just make sure you’re always having fun and experimenting with different shapes and features. If you make mistakes, that’s all good. It’s through our mistakes that we get better!
These characters were taken from my courses How to Draw Male Faces and How to Draw Female Faces. Feel free to check them out. Otherwise, just keep practicing and having fun with your drawings!
All the best,
Malcolm Monteith
Melbourne