Adobe Photoshop has many brushes, all with their own strengths and weaknesses. If you’re like me and get overwhelmed with too many options, then I recommend you just start with the most basic brush and give it a few tweaks. Woo!
One of the best Photoshop brush settings for lineart requires a hard round brush with 10% brush spacing, pen pressure controlled size jitter with smoothing set to at least 10%.
In this sweet and short article, I will walk you through how to setup your brush settings for some easy inking. Buuuut before we begin:
Select your brush by clicking on the brush icon in your Tools bar or by pressing B.
Also, to get the most out of these features, make sure you have a drawing tablet. If you don’t, I’ve got a list here to help you choose.
Hokay let’s begin!
Open Brush Settings
In order for you to make changes to Photoshop’s default brushes, you will need to access Brush Settings by selecting:
Window > Brush Settings or, if you’re lazy (I mean efficient), press F5.
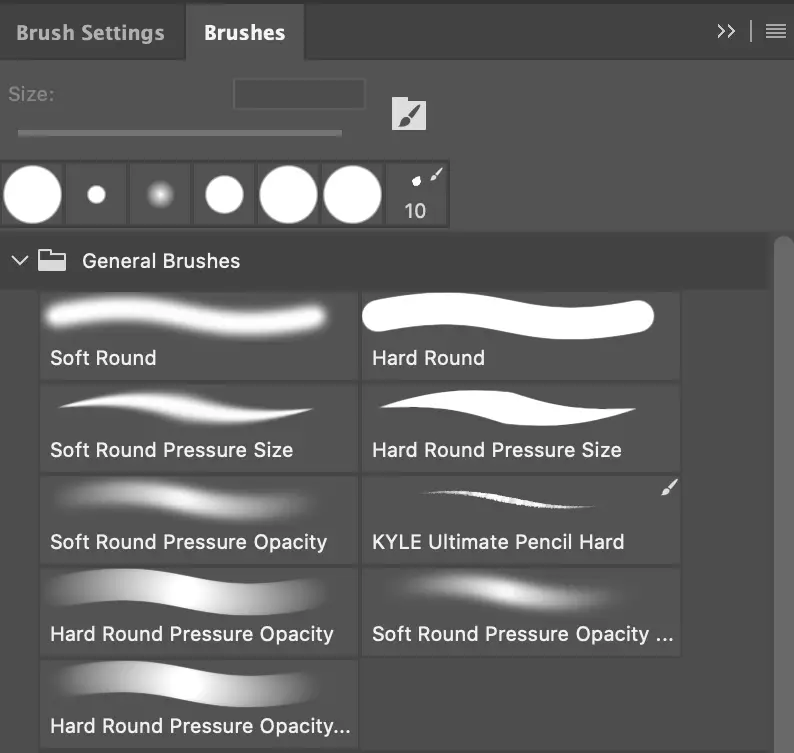
Select a Hard Round Brush
You can access General Brushes by simply right clicking. Now select the Hard Round brush.
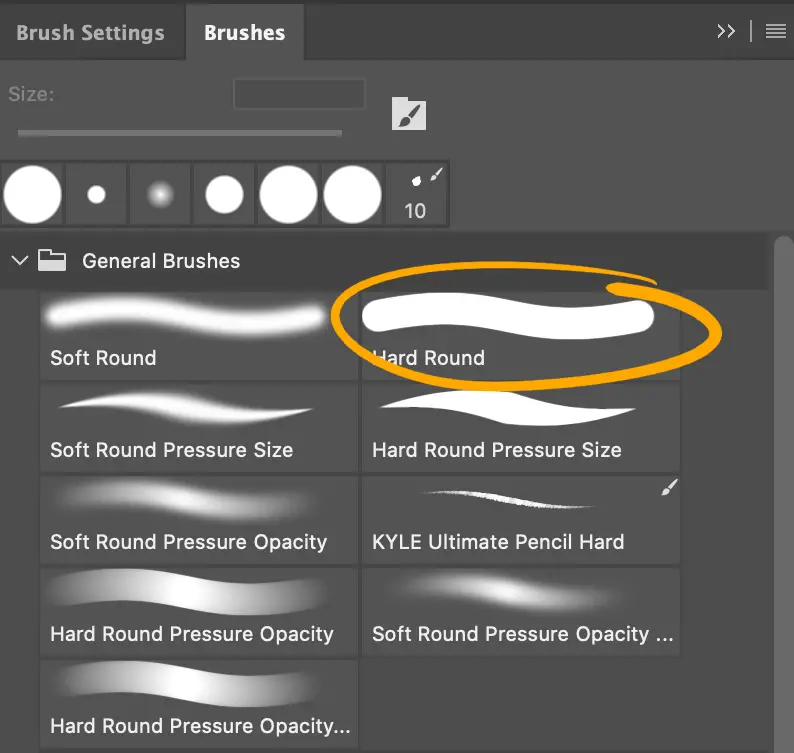
The great thing about the Hard Round is that it has hardness is set to 100. Which is 100 points more than the worst inking brush: The poor, lonely Soft Round! However, Soft Round brush does have its uses, just not for inking.
(I’m kidding, if you wanna ink with blurry lines, it is your right to do so).
Lower the Brush Spacing to 10%
Your Photoshop brush is essentially just one dot. Your lines that you draw is that single dot repeated over and over a whole butt-load of times.
You can control how many times the dot is repeated using Spacing.
What is Spacing in Photoshop Brushes?
In Photoshop, brush spacing is the distance between each mark that the brush makes. The lower the spacing, the smoother the line will be. The higher the spacing, the more far apart each mark will be.
Once you’re in the Brush Settings, make sure you are in the Brush Tip Shape section. At the bottom you’ll see Spacing. In the screenshot below, the brush spacing is at 25%.
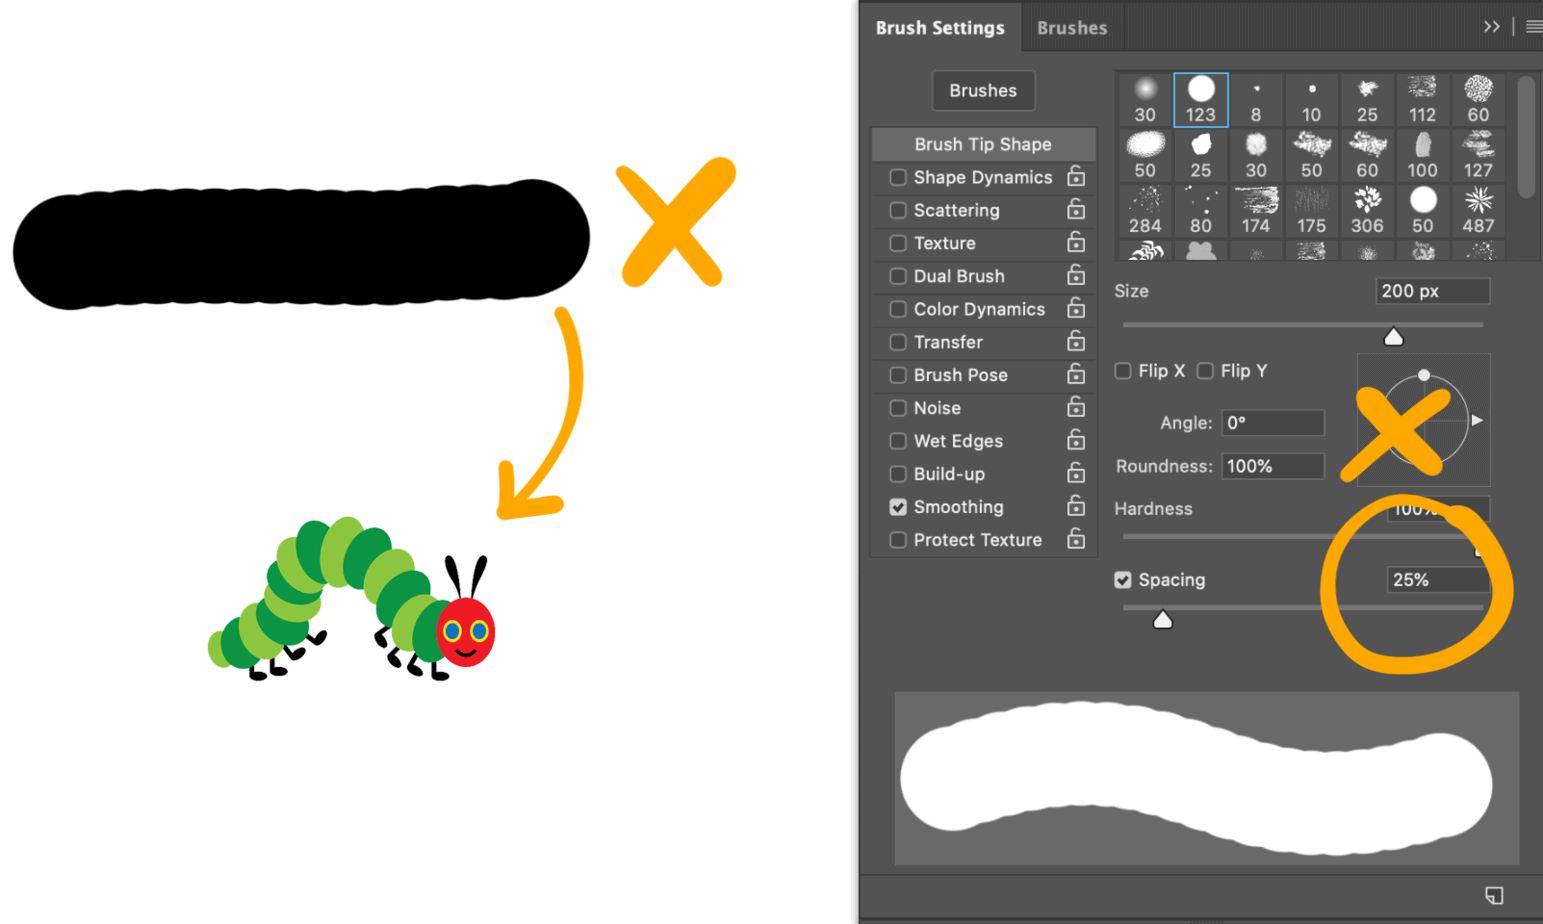
I can’t think of many situations where you would want to have such a high level of brush spacing. I mean, look at the horrible line I drew on the left there. Looks like a hungry caterpillar.
We can do better!
Bring the Spacing down to 10%. It’ll look like the second line below. Look at it now. It’s as smoooooth as eggs!
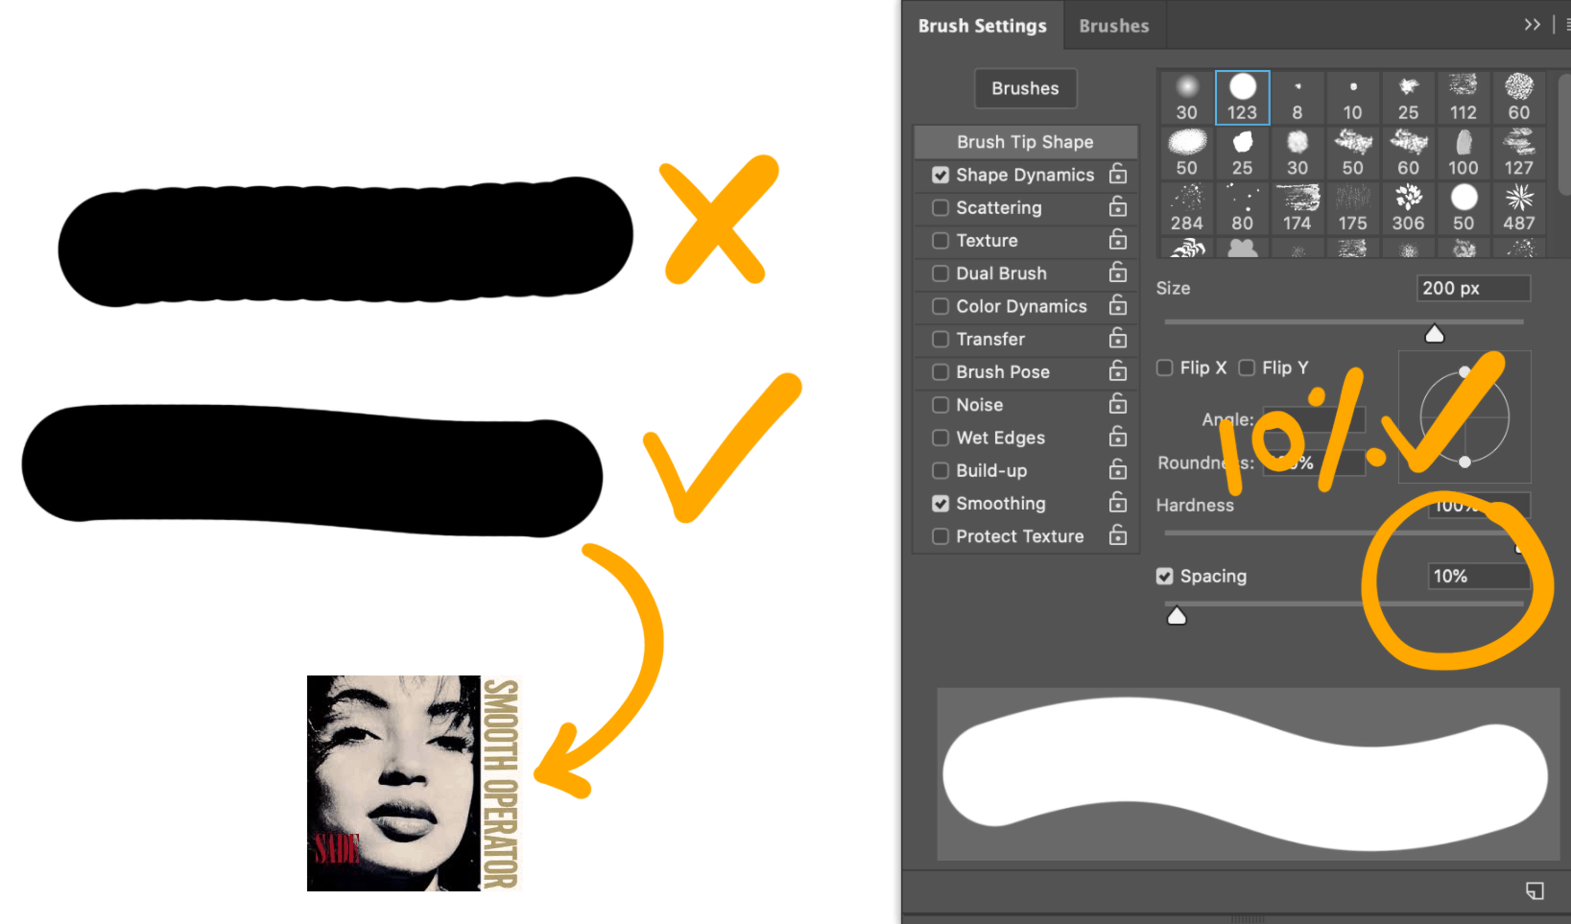
You might be wondering why I chose 10%. Why not 5% or 1%?
Personally, I find anything lower than 10% doesn’t make too much of a difference to how my lines look. Lowering the spacing any more than I need to will just be using up unnecessary and precious RAM.
Enable Pressure Sensitivity
What is Pressure Sensitivity?
Pressure sensitivity is a feature in Photoshop that allows the artist to control the size of their brushstrokes determined by the level of pressure they apply to the tablet with their stylus.
Is Pressure Sensitivity Important?
Using Pressure sensitivity is very important for digital artists. Pressure sensitivity allows artists to create more natural looking lines that emulate inking with a real pen. If pressure sensitivity is not enabled, then the artist’s line art may look lifeless and stiff.
How to Enable Pressure Sensitivity in Photoshop
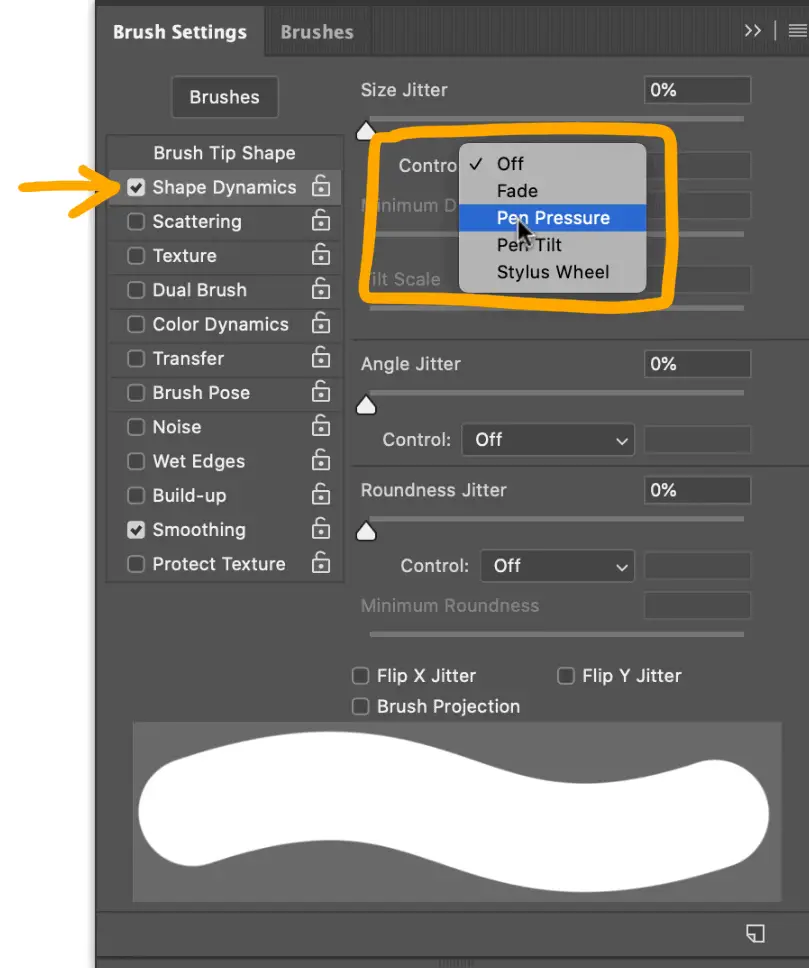
To enable pressure sensitivity in Photoshop, select Shape Dynamics in the Brush Settings.
At the the top of Shape Dynamics you will see Size Jitter.
What is Size Jitter?
In Photoshop, Size Jitter allows your brush to decrease and increase in size as you are making your brushstroke. If you set Size Jitter to 0%, you can still control the size of your brush using Size Jitter’s Control option (for example, Pen Pressure).
Aint no coincidence that I used Pen Pressure as an example, because that’s what we’re going to set our Control to.
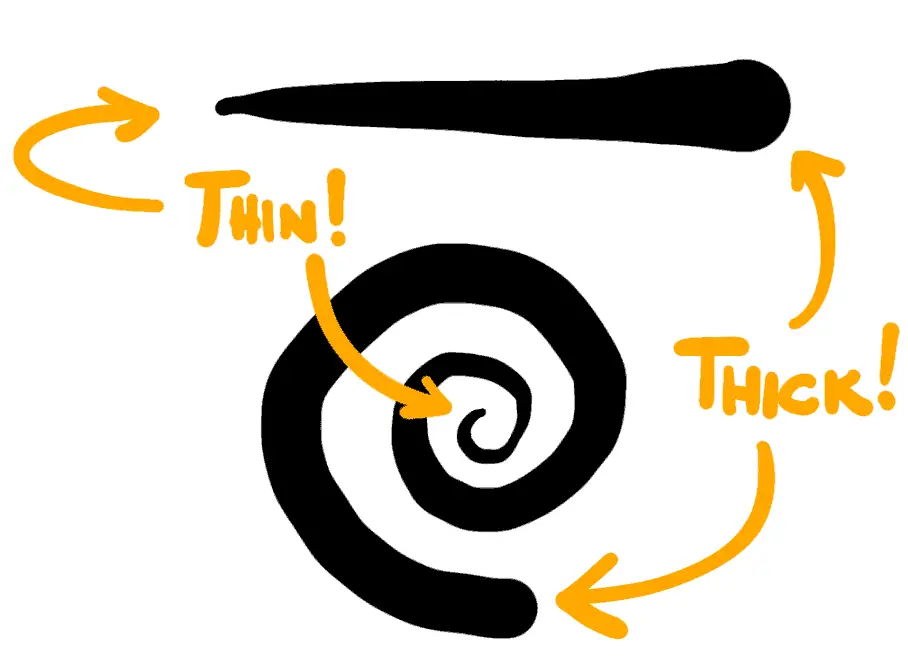
Now that you have Pen Pressure set as your Size Jitter Control, you will now be able to make your lines thicker or thinner, depending on how hard (or soft) you press down on your tablet while drawing.
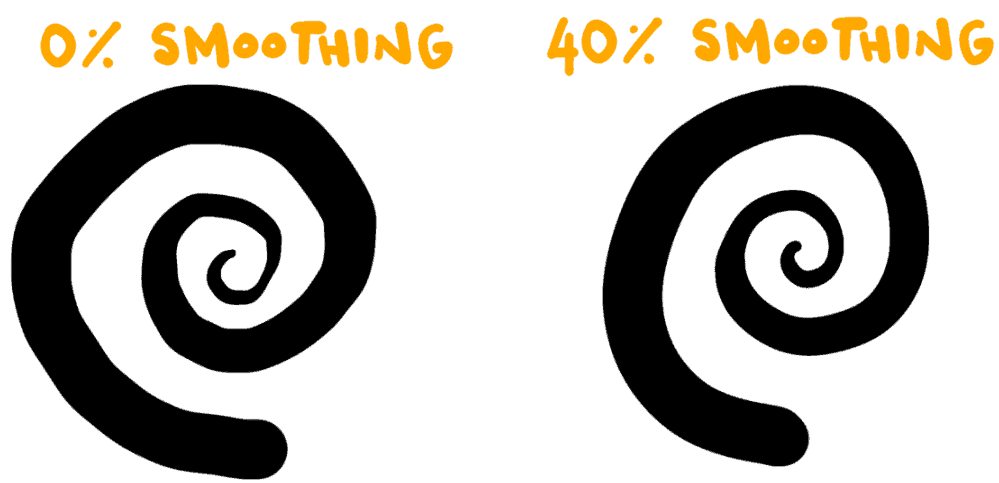
There is one more step to do. Notice that the spiral is a little bit jagged and shaky?
- The line is jagged because my tablet and software can’t keep up with my lightning fast moves.
- The line is shaky because when I’m drawing slower lines, Photoshop is picking up too much of my hand and pen movements.
(Or perhaps I’m just one massive Photoshop n00bcake).
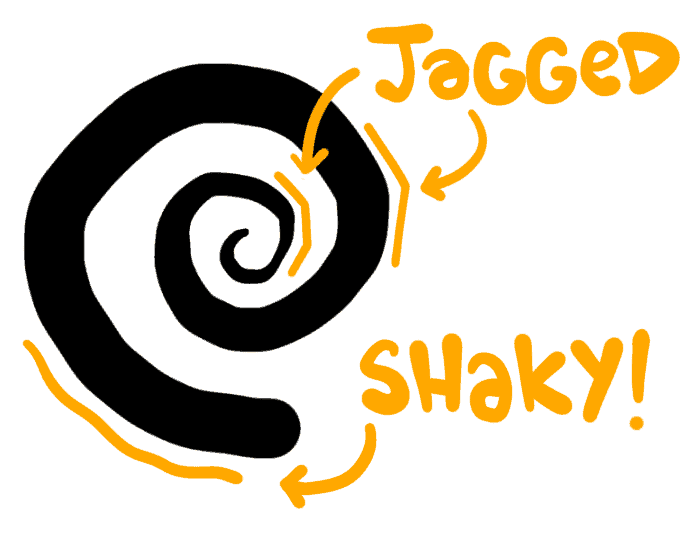
We can fix this with a little bit of Smoothing
Add Smoothing to Your Brush Strokes
At the top of your canvas, you will see a Smoothing option. Set this to at least 10%.
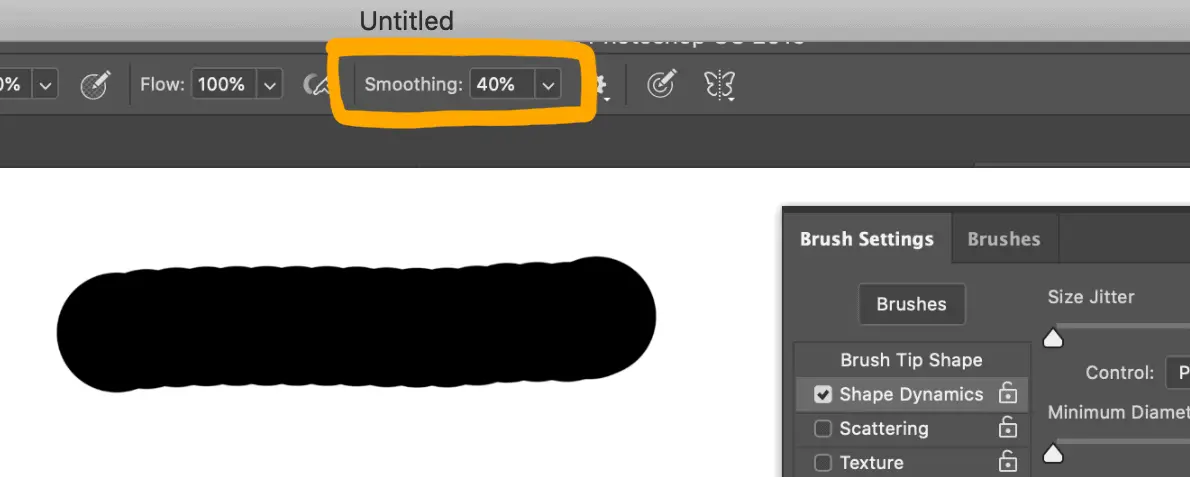
In the screenshot below, I re-drew the spiral with brush smoothing at 40%. It just makes things look a little bit better!
…But Beware of Too Much Smooth!
When using Smoothing, there is no one size fits all option. You will need to work out what smoothing level is appropriate for you.
You will also find that you will need to adjust the smoothing of your brush depending on what speed and what size you are drawing at.
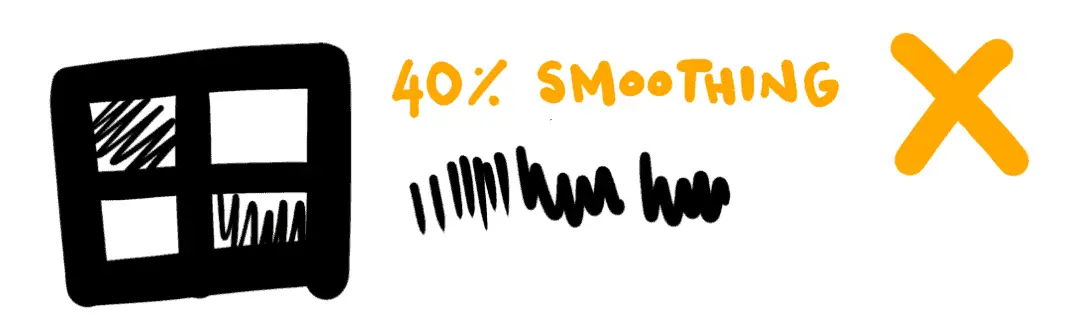
For example, check out the grid and scribbles that I drew below. The two by two grid was drawn using 40%, which was the appropriate level of smoothing for me (and for my tablet and computer).
But take a look at the shading inside the squares and the squiggles to the right of the grid. I was wanting to do some quick, short hatches, but I did not get the effect I was wanting.
While the 40% smoothing was good for drawing the big grid, it wasn’t good for the fast hatching that I was trying to do.
This is because the higher your smoothing level is, the longer it takes to complete the brushstroke. So I was essentially starting my new stroke, before Photoshop had completed my last stroke.
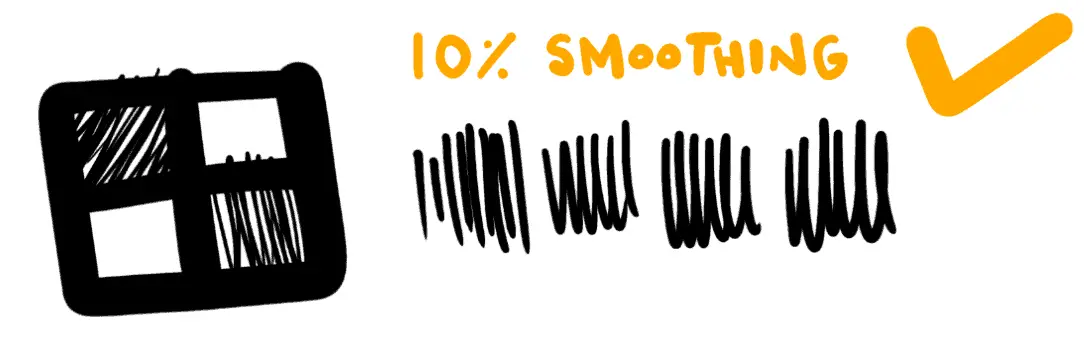
So I did this again, but this time I lowered the smoothing down to 10%. In the image below, the strokes in Photoshop were completing much faster. Photoshop was able to keep up with my brushstrokes.
Conclusion!
In this article we have learned (in my very biased opinion) the best Photoshop brush settings for lineart.
- First, we selected our regular, boring ol’ round brush
- Then, we reduced the spacing down to 10%.
- We then enabled pressure sensitivity in the size jitter section in Shape Dynamics.
- Finally, we adjusted the smoothing to 10% or greater.
There are many other ways to setup your brush in Photoshop. If these brush settings work for you, then great! If you’ve tried them and the brush isn’t doing it for you, then experiment with the different brush settings (smoothing levels, spacing levels etc.) and see what you come up with.
Best of luck!
Malcolm
Run out of things to do in your day? Check out these amazing articles!
Is Drawing Every Day Good For You?
Do Artists Trace? (is Tracing Okay, or is it Naughty?)
Why is Photoshop So Expensive? (and Why it’s Worth It!)
Will Digital Art Replace Traditional Art? (3 Reasons it Won’t!)
Is Digital Art Cheating? (Spoiler Alert: It Aint)
Do Illustrators Get Royalties? (And How Does it Work?)
Are Illustrators in Demand? (9 Reasons That They Are)
How Much Do Illustrators Make? Let’s Find Out!
Is Being an Illustrator Stressful? How to Deal with Problems You May Have
Becoming an Illustrator at 40 (How to Do it Right)
How to Get Your First Illustration Job (With 2 Important Things)
1 thought on “Best Brush Settings for Lineart (Photoshop) in 4 Easy Steps!”