Graphics tablets are amazing. They are the bridge between artist and machine. They help move forward the careers of millions of creators around the world! We all remember the day we came home with our first graphics tablet, plugged it into our computer… Aaaand then realised that they can be pretty difficult to draw on. So why is drawing on a tablet so hard?
Drawing on a tablet is difficult because graphics tablets lack the feeling and responsiveness akin to traditional drawing. The main reasons for this are because graphics tablets have a slick, smooth drawing surface and often produce less accurate lines compared to drawing with a pencil on paper.
While some artists are able to almost perfectly mimic the appearance of traditional media on a tablet, for the rest of us, it can be pretty tricky. But fear not, friend. In this article we are going to discuss the different reasons why drawing on a tablet is difficult, and how to overcome each problem you may be facing!
First accept that it won’t be the same as drawing on paper. But with a bit of patience and practice, drawing on your tablet will become easier.
A Tablet’s Surface Texture is Slippery
Problem: The surface of your tablet is not at all like paper. Tablets have extremely smooth surfaces, and unfortunately, the standard nibs that come with styluses are also very smooth.
Add these together and you might as well lather yourself up with baby oil and slide across your nearest ice-skating rink.
Solution: To emulate the surface of paper on your tablet, I suggest that you try and tape some paper on top of your tablet. (Not a very elegant solution, but an intuitive one).
If that didn’t do the trick for you, then consider trying to put a different nib in your stylus.
Wacom has a variety of nibs that you can swap out with the standard stylus nib. Nibs like the Felt Nib are designed to emulate a more rough, papery feeling when you draw. This could help with pen stroke control.
A Tablet’s Surface is Not as Responsive as Paper
Problem: If you draw too fast using a tablet, then you will potentially cut the corners of your strokes.
For example, if you draw a square quickly on a piece of paper, it will have sharp corners. If you do the same thing with a graphics tablet, you might end up with a very unconvincing, blobby square.
Or if you draw a circle really quickly with a graphics tablet, you may end up with a few corners on your circle (which you had probably hoped to not have corners at all).
The reason for this is the computer’s response rate will never be as fast as how quickly paper responds to your pencil. The tablet, computer and your software need time to catch up to your super fast arty ninja strokes.
Solution: Slow down a bit and have a bit of patience. I don’t mean wait ten minutes after each brush stroke, but just wait half a second for the cursor to catch up with you. Then proceed to your next stroke.
You won’t always have to work this way, but you will get a good idea of when this is needed. Remember that if you don’t like your stroke, you can always erase or undo.
You are Drawing in Two Areas at Once
Problem: Some artists new to digital art will struggle with the notion of drawing in one area and seeing the image appear in another area.
After having drawn using pencil and paper since childhood, you could be forgiven for finding this new way of drawing to be a little bit bizarre. Don’t worry! I have solutions! I’ll give you a cheap option and an expensive option.
Solution: First, don’t move the tablet – keep it in one position and get used to that one position. I like to put my tablet directly parallel to my keyboard and monitor.
Practice making brushstrokes while following your cursor with your eyes. Draw a circle, then trace it, and trace it again. Keep drawing over your circle while you follow the cursor.
Next try drawing a square. Now do the same thing, keep drawing over it while following your cursor.
Performing exercises using basic shapes will help to get your hand and your eyes in sync with each other.
If you practice drawing with a tablet enough, looking at the cursor will become as easy as looking at paper.
The expensive solution? Buy a fancy graphics tablet with a screen.
The Size of Your Tablet is Different to the Size of Your Canvas
Problem: We’ve all been there. You’ve got your digital canvas ready to go, you start drawing on your tablet. Aaand then your cursor reaches the end of the canvas while your stylus is still happily dancing around on your tablet’s surface
Having your canvas and your tablet area at different sizes might seem like a deal breaker, but this is definitely a problem that’s very easy to fix.
Solution: Use your software’s Hand Tool to reposition your canvas while you are drawing. Simply hold down Spacebar and drag the canvas with your cursor.
Check how to work the Hand Tool with your preferred drawing software. I have checked this on Adobe Photoshop, Affinity Photo and Autodesk SketchBook. Holding down spacebar and dragging the canvas works for all three of these programs.
Brushstrokes Can Look Shaky
Problem: Your tablet and stylus might be so sensitive that they register every tiny movement that your hand is making. So if you were to draw lines using pencil on paper, the lines might look good, but when drawing digitally, the lines might look shaky
Shaky lines can occur if your brushstrokes are too slow or if your brush settings are not properly calibrated. Fear not – you’re gonna fix this!
Solution: Increase the smoothing in your brush settings. This will remove those pesky shakes and will help make your lines look more accurate.
In Photoshop, this function is simply called ‘smoothing’, but it might be called something different in your program (for example, Affinity Photo calls it ‘stabiliser’ and ProCreate calls it ‘streamline’). If you can’t find this function, jump on Google and search for ‘brush smoothing < your program name>’.
Be careful how you use smoothing – the brushstroke will lag a bit behind your cursor. So if you are wanting to change direction of your line (for example, drawing a right angle) then wait for the line to catch up with your cursor before you change direction.
The smoothing function has a slider going from 0 to 100. Have a play around with this and find the best level of smoothing that suits you.
Brushstrokes Can Look Too Spaced Out
Problem: Do you ever draw a nice, fat line in Photoshop, only to find it looks kinda bumpy, like a Hungry Caterpillar? This is because your spacing settings are too high. Let’s look at how to fix this!
Solution: In Photoshop, go to Window > Brush Settings. In the Brush Tip Shape section, you will see the Spacing slider at the bottom. Lower this to 10% or under.
Now you will be drawing silky smooth lines, instead of those horrible lumpy Hungry Caterpillars!
Relies On Computer Specifications
Problem: Although it’s great that digital artists don’t need to constantly spend money on art supplies, there are a few supplies you need up front, and that includes a computer.
Unless your computer is some super up-to-date BEAST of a machine, there may be limitations to how you work. A computer could face issues with speed (RAM) or storage (disk space).
If you are not in the market for a new machine – there are workarounds.
Solution: Optimise your canvas size and your resolution. For example, if your image is exclusively going to be used for digital (ie. not being printed), then set your image resolution to 72 DPI (Dots per Inch) – which is the minimum resolution required for digital images to not look blurry and ‘orrible.
If your artwork is going to be displayed at a maximum of 10 inches, then make that the maximum size of your canvas. Any size higher will just clog up your storage even more.
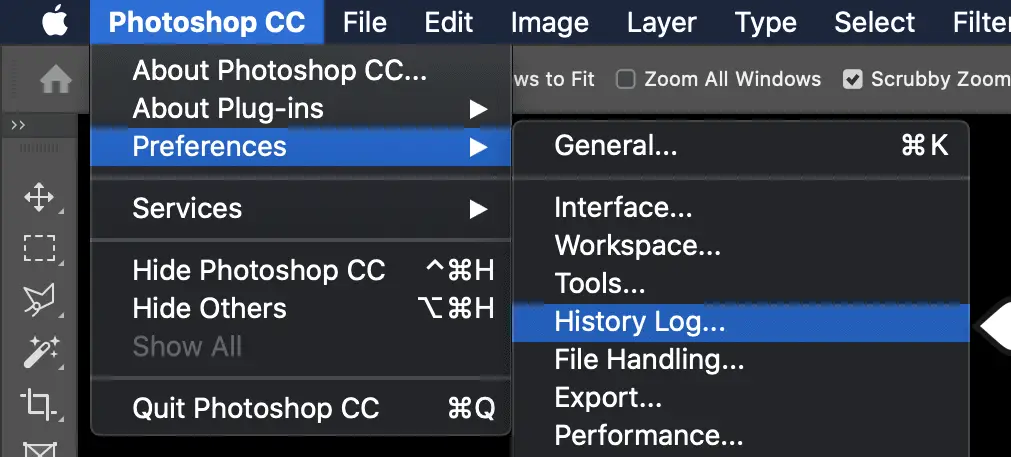
Another way to help with your computer’s processing speed is to limit the states in your History (image below), or simply don’t go too crazy with the amount of layers you are working with.
Buttons Get in the Way
Problem: If you like all the buttons and touch strips on your tablet, then please skip this section.
Personally, I don’t want buttons on my Wacom. I have never wanted buttons on my Wacom. I don’t want a fancy slidey touch strip either.
All they do is get in the way of my flailing limbs and then activate things I don’t want to activate.
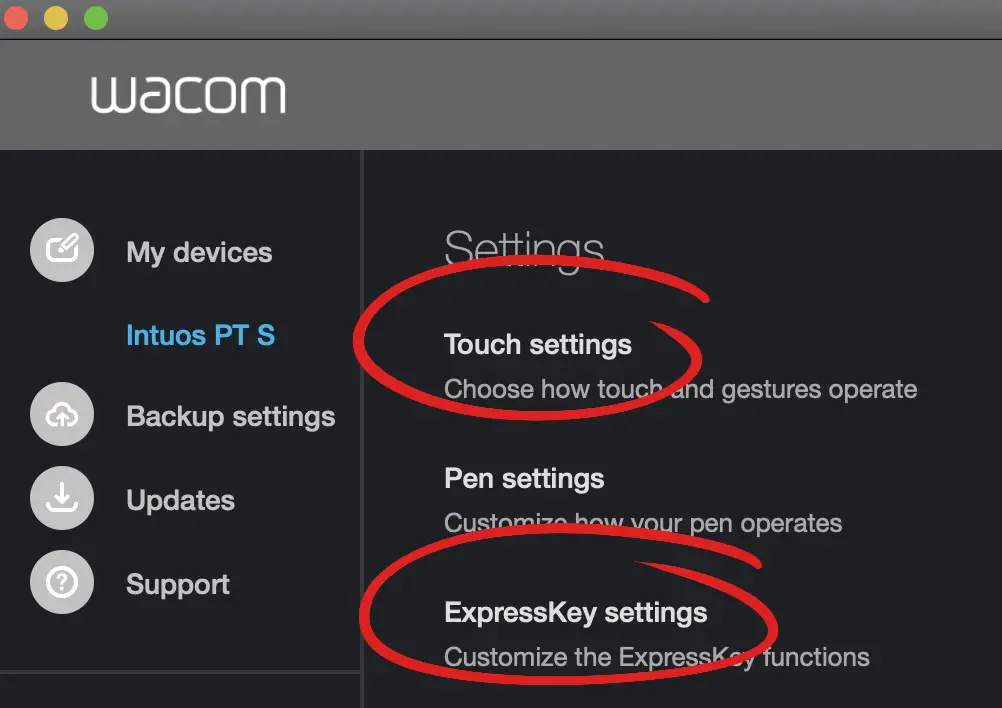
Solution: I can’t speak for other tablet brands, but if you’re using Wacom, head over to the Wacom Desktop Center and select the device you are using
Conclusion!
Drawing on a tablet can be hard, especially at the beginning. But I hope these tips will help you improve your tablet skills.
If you are struggling to use your graphics tablet, the first thing you should do is identify what the problem is, and then focus on how you can improve yourself (…or your hardware/software!).
Remember that the tablet is just another tool. If you’re just not digging the whole tablet thing, then use it sparingly. For example, you could perhaps do your line work and inking on paper before you begin the digital process. Over time, you will get more comfortable with working with your tablet, and hopefully this will help you get things done more efficiently.
Art is a marathon, not a sprint – Like anything, if you practice enough, you WILL improve.
Best of luck!
Malcolm
Run out of things to do in your day? Check out these amazing articles!
Is Drawing Every Day Good For You?
Do Artists Trace? (is Tracing Okay, or is it Naughty?)
Why is Photoshop So Expensive? (and Why it’s Worth It!)
Will Digital Art Replace Traditional Art? (3 Reasons it Won’t!)
Is Digital Art Cheating? (Spoiler Alert: It Aint)
Do Illustrators Get Royalties? (And How Does it Work?)
Are Illustrators in Demand? (9 Reasons That They Are)
How Much Do Illustrators Make? Let’s Find Out!
Is Being an Illustrator Stressful? How to Deal with Problems You May Have
Becoming an Illustrator at 40 (How to Do it Right)
How to Get Your First Illustration Job (With 2 Important Things)
5 thoughts on “Why is Drawing on a Tablet So Hard? (And How to Improve!)”